Tuesday, March 27, 2012

Kitchen Tray Upgrade


A year or so ago I was sent a bunch of these photo collage trays from on of the vendors at work. It was partly my fault, I requested a mug and mug warmer, but I guess they felt I ordered too much to just be blessed with a mug and warmer, I needed SIX of these trays. Which maybe for most labs would be fine, but we only have three employees in the lab, six was a little overkill. And on top of it, no one wanted one.


So they sat under a bench for almost a year. Well actually there are still a few under there. I guess I better start thinking about what to do with the rest.


But anywho, I grabbed one because I thought we could use it at home for something. I tried the whole photo collage thing, but decided I didn't like it. So I used some left over fabric from our pillows and tada, a nice little tray for the living room. It then turned into a tray to hold the beads for my current project, but it works.


And then when we installed the new counter top next to the stove, I needed a way to organize all my crap that I use on a daily basis.  I just looked like a mess, I had to do something.  After perusing the interwebs, I found many ideas for countertop organization.  One of the main ways was to use some sort of tray.  Well that was perfect, remember, I still had five trays sitting at work.

So long story long, I decided to make one over for the kitchen.   It needed color and the something for the bottom.  


I took the whole thing apart and this is what I started with.  I then used some liquid sandpaper on it to get rid of some of the sheen.  I love that stuff.


I then stuck push pins in the bottom of the tray to keep it off the paper when I painted.  God I love the internet.  I would have never thought of something so simple without it.  I unfortunately don't remember where I saw this, but thank you who ever posted it. 


And then came the primer.  Two coats gave me a pretty good coverage, with a light sanding in between.  I wanted to make sure that there would be no pealing.

I used the Fast Prime 2.  This stuff is awesome and made specifically for surfaces like this.  You can use it to paint laminate, how awesome is that?  And this one is water based, so pretty easy cleanup.


Then after the primer came paint.  I used paint we had left over from the back bedroom.  I think it's a nice color green to accent the backsplash (if we ever get it installed).  And again I painted two coats on the tray.


To make the decoupage part, I ripped up some pages from a book I got back in college.  I think it was for one of my anthropology courses, but I don't remember.  I don't really even remember using it.  Oh well, it makes a great book for projects like this.

I just ripped out some pages, ripped them up into random sizes and used my trusty Mod Podge.  I spread some Mod Podge out, stuck the pieces of paper to it, and then sealed it all with Mod Podge once it was finished.


And after it was all dried, I put the whole thing back together, just like a picture frame.  And now it holds all my cooking crap.  It does a fantastic job keeping everything organized and helps things from wandering off.    

Thursday, March 22, 2012

The Easiest Curtains Ever

Well maybe not the easiest.  The easiest would be just buying curtains that fit or tacking some cloth up there with thumb tacks, that would be pretty easy.  This project does contain sewing, but very little and really no hemming, which is the hard part (at least it is for me).


When we moved in, our bedroom was the only room that didn't have doors on the closet.  It had a curtain, which is fine, if the curtain fits.  This curtain was a sheer red number that was about four inches too long.  It drug on the floor and collected pet hair, you pet owners know what I'm talking about.  It was the first thing I took down.  I may have despised it.  And anyway, it wouldn't go with our soothing, cool blue walls.


But that left us with our closet exposed, FOR A WHOLE YEAR.  Now I've seen plenty of people take their closet doors off and love it, but our closet was not made for that.  It's very small and was a huge eye sore.  The top was all of J's black only wardrobe, and good god does this man have a lot of clothes.  Possibly three times as much as I do.  And the bottom was my stuff, all organized by color, thank you OCD, plus a ton of plastic boxes that are organizing our things for now.  Not exactly pretty.  It had the ability to grab your attention, like a car wreck that you just can't look away from.  I mean look at it, I'm actually embarrassed to even show it off. 

That all changed the other day.  I was sick of waking up and looking at that unsightly mess.  The rest of the room is coming together so nice, and then there was that.  Blah.  I was determined to make something, with supplies I had.  It just so happened that I had curtains from our old place that were black and white.  Well, one was white and one was black.  Perfect.

So off  I went with a tape measure.  I measured the closet door and decided on a length that would work the best.

Now I don't have pictures of the whole process, my working conditions were deplorable.  I was also painting my studio, so I had to work in cramped conditions on the sun porch with a pug "helping" every step of the way.  So thanks to Inkscape, I was able to draw up some step by steps.    


I started with the white curtain, this will be referred to as "curtain one".  It was a tab curtain that we picked up a while ago to give us a little privacy in our old bedroom.  I don't remember where we got it, I think Menards.  It's a canvas type material and both sides would be wide enough for our closet door.

The length of the curtains was about 17 inches too short, so that's where "curtain two" came into the picture.

 
Curtain Two was a sheer black curtain that we bought for our old bedroom for that layered look, basically we thought the white curtain was too plain.  This curtain was wider then the first, but that was fixable.


Once I had the length and width thing figured out, I set to work making the curtains.  I cut the first curtain in half.  I didn't measure, I just folded the curtain in half and cut.  This method seemed to work fine for me.  Sorry mom. 

 
I then cut the top hem off the second curtain.  After I had done that, I realized I could have just taken the hem out and wasted less fabric, but that's okay.  How ever you do it, just get rid of that top hem.

I cut 19 inches of the fabric.  I needed 17, but I wanted to be safe, so I went a little bit larger for safety's sake.  You can always shorten something, you can't always lengthen it.


Since curtain two was a little bit wider then curtain one, I cut the edges off and serged the side with a nice rolled hem.  Now if you don't have a serger, that's okay, you can just quickly hem the sides.  The end rectangle should be the exact (or close enough) width as curtain one.


Once I had my rectangle of fabric, I just sewed the it to the top section of curtain one and then sewed it to the bottom section.  I used my serger for this as well, but a regular sewing machine will work just as well.  I then repeated the whole process for the second curtain.  The only thing left to do was to hold my breath and hope they worked.


THEY DID!  Okay, so I may have had to adjust one of them a bit, but it wasn't a big deal.  And because I started with hemmed, hangable curtains, I didn't have to fuss with anything.  I just cut in half, sewed in a panel, and hung.  Now that's my kind of project.

And I have to say they look much nicer then an open black hole of t-shirts, luring you to step closer only to suck you in, never to be heard from again.  Now just to get that pesky trim painted white.  :-)

Wednesday, March 21, 2012

Bath Time


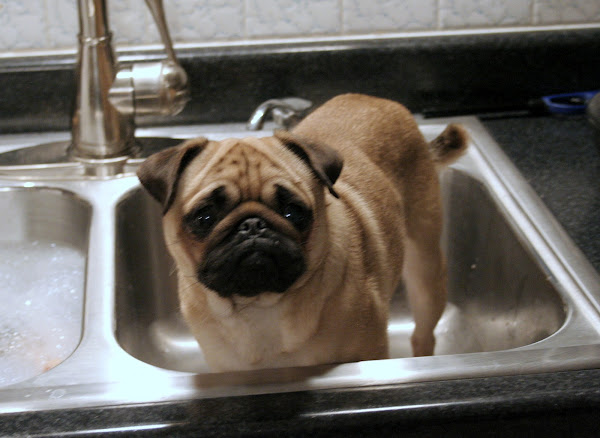
Okay, so this isn't a picture of the curtain I made for our bedroom closet. Truth be told, I didn't remember I needed to take pictures of it until it was dark out. I know, what was I thinking. So my goal for tonight is to take pictures of it tonight. But no promises because we're heading down to the terrace for drinks after work. ;-) But I thought this was a cute picture and I'm hoping it holds you over until I get another project posted.

Yoda doesn't get a bath in the kitchen sink anymore, but she sure looks cute in there. She actually gets a bath once a week in our new laundry tube. It's the perfect size for a pint size pug.  And as you can tell by the worried look on her face (even though it's a blurry picture), she is not a huge fan of bath time.

And if you're in the Madison area, the terrace is a beautiful spot to check out and enjoy the view of the lake.  

Tuesday, March 20, 2012

The Small Ones Add Up!

This weekend was such a blur.  It seemed to slip by so quickly, even though it was three days long.  But it was happily a productive weekend.  Which is always a plus.  We didn't get any major projects started or finished, but we did happen to get a bunch of little ones finished up.  Which is just fine, I mean the little projects have to be finished too.

My first project was making a set of curtains for our bedroom closet, but I haven't gotten pictures yet, so you'll have to wait until tomorrow to see those.  Sorry.

Today tip, if you ever plan on doing any amount of sewing, get yourself one of these, a serger.  It makes things so much easier.  No pins, no trimming, and a secure seam.  How did I ever live without one?


Project Number Dos, I covered my studio cork board with fabric.  Again, a simple project but one that needed to get done.  I just took some fabric I already had, actually I've had this fabric for years, and stapled it around the cork board I already had.  I'm debating if I want to add some decorative accents, but for now, it works great.  And look at how fun it is.  Another easy and FREE project.


I also primed and painted my peg board.  It doesn't sound like a lot, but it makes a huge difference in my studio.  I have been meaning to paint it for a while, but kept putting it off.  It's easy to do when the peg board if filled with crap.  But I figured if I was painting my studio, I might as well have a lovely pegboard to match.  So now it's bright white and looks great.  Yup, you can add this one to the easy and FREE project pile.  As you can see, I had a little bit of a theme going on this weekend.

And last but not least, I finished painting the walls in my studio.  WooHoo!!


Now all I have to do is paint the trim and the shell of the studio is finished.  I plan on starting the trim tonight, hopefully I'll actually get to it.  That was the plan for last night, but I decided that I should put up my pegboard.  Then that turned into me organizing and getting the one wall organized.


It wasn't the plan, but it makes me smile every time I walk past the room.  All of my stuff is sort of organized.  It's so pretty and so nice.  Just looking at these pictures are making me smile as I type.


Now there is plenty that needs to be done still, but it's a good start.  I plan on trying to drag J away from homework for a while to help me make and install some shelving.  Then we need to find a way to mount the computer under the desk and out of the way.  And maybe make a shelf for that huge printer.

So lets look at my studio list of what to do and see where I am today.
  • Paint walls
  • Prime paneling
  • Paint stripes
  • Paint Trim
  • Paint ceiling - thought we wouldn't have to do this, but we will
  • Paint pegboard
  • Put up pegboard
  • Put up organizational boxes
  • Make shelves
  • Paint shelves
  • Put up shelves
  • Prime and Paint furniture
  • Paint magazine holders
  • Make fabric boxes 
  • Cover computer chair
  • Paint closet
  • Make shelves for closet
  • Get exhaust fan for torch
  • Get/make table for glasswork
  • Put in recessed lighting
So, I have a LOT of things to finish up.  I'm not even close to being done, but at least I have a functional studio again. That's a plus.

Wednesday, March 14, 2012

Open Shelves, Up and Running?

Okay, probably not running, but functional.  Yeah, lets go with that.

Last night I got sick of looking at a blank wall and shelves sitting on the ground.  So I did what I always do.  Got the tools out and took care of the job.  And look at what I accomplished in a very short period of time.  


Installing shelves are not really that impressive of a task.  I'm pretty sure anyone can do it.  But just in case you were wondering how I do it, I  included step by stem instructions.

First things first, draw your line.  


Now I know a lot of people don't do this, but I always do, especially when I'm doing this by myself.  It's easier for me to line up the level if I have an idea of where my shelf should go.

So to do this simple step, I held the shelf up to where I wanted it and drew a light line.  Then I got the level out and re drew the line level.  You wouldn't want an unlevel shelf now would you.  I also marked where the shelf would end and decided the brackets would be 3 in from the ends.  I just pulled that one out of you know where.  You can put the brackets where ever you like I guess.

I then used the stud finder to see if I would luck out.  I did not.  The studs were right next to my dry erase board, right in the middle of the shelf, and right next to the fridge.  But that's okay, that's why they make anchors.

To install anchors is just as easy as putting up a shelf.  Make sure your anchors are made for the job at hand.  I keep a pack of general anchors in the kitchen all the time.  You never know when you'll need them.  They hold four different screw sizes and need a 1/4" drill bit.  And they are tough little guys.  Perfect for our shelves.


And here we go.  I held the bracket up at my 3 in mark and lightly drew where the holes would be.  Then used my little level to make sure that the bracket would be level as well.  Then with my 1/4" drill bit and my favorite Dewalt handheld screwdriver (that also has a drill setting), and I started drilling my holes.

I use the painters tape trick to catch the mess that falls out of the wall when you drill.  Thank you internet for this tip.  It saves on clean up time.


And now I have both of my holes drilled.  I normally take my level and make sure that these holes are still as close to level as I can get.  Not that I know what I would do if they were off.  I guess patch and wait to be able to drill again.  


Now you just insert the anchors into the wall.  If they don't go in with a hard push, just use a hammer to lightly tap them in.  They should fit snugly in the holes you drilled and not feel like they are going to fall out. 


Now you're ready to install the bracket.  Just install the screws like you would if there was a stud behind the wall.  Easy Peasy.

I used black drywall screws for this project because they match our modern/slightly industrial look we're going for.  We used same black screws to make the free standing counter.  They are our go to screw in projects that the screw will be visible.  But you can use any screw that will work with your decor and bracket.   


Then just install your shelf.  Use small screws to make sure the shelf in secure to the brackets.  I pulled on each bracket and the shelf to make sure that they would hold up to what ever I intended to put on them.

My shelves are not secure right now because I need to take them down and put the trim around them.  Hopefully that will happen this weekend.  Also, our plyboard bowed a little bit (as you can see), so we are hoping that by putting something on it, it will straighten out a bit.  If not, we'll be making new shelves in the near future.


I just repeated these steps for the top shelf and before I knew it, I had two shelves installed.  Now I need to go pick up a third bracket for the large shelf.  It might start to sag in the middle if we don't.    And like I said above, the trim has to be added, but overall, not bad.  The kitchen looks so much nicer with them up.  Sorry for the night shot, by the time I got the shelves up, the sun had set.  But you get the idea.  Now to decide what to put on them.  :-)


Pin It

Friday, March 9, 2012

A walk down kitchen memory lane

So I was just thinking that I haven't shared any pictures of the kitchen's progress for a while.  I mean, I've shared pictures of this and that, but not an overall picture.

Lets get started on our little walk.


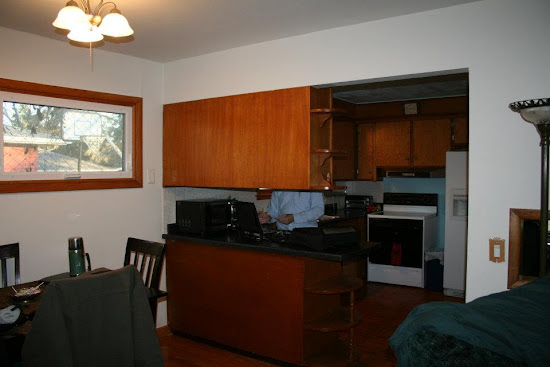
Here is the kitchen before we moved in.  This picture was actually taken during our home inspections (that's the inspector behind the cabinets).  We loved the house, but knew the first thing we would be working on would be this kitchen.  It had so much potential, it just needed someone to come help it out a bit.


So first things first, we painted.  But we knew that we wouldn't be able to live with the kitchen like this for long.  I man look and how closed off it is.  What's the good in having a fairly open concept house when you have cabinets in the way.   We even tried to dress up the cabinets with pictures, but it didn't work.


So we took out the cabinet, opened up the wall about a foot and a half, ripped out the old floor, and started staining the cabinets.  It already is a vast improvement.  Look at how open and wonderful this is.


And here we are at the end of summer.  Not fully done, but looking a hell of a lot better.  I love the dark cabinets, which admittedly, I didn't think I would.


And at the beginning of fall we had added the pan rack, some more counter space, and started the bookcase.  By this time, about 90% of the staining had been finished.  We just had a couple of areas to finish up.


And at the end of December we were here.  The beadboard was stained and up around the lower cabinet.  That gets so many compliments when people walk in.  It's because beadboard is awesome.  We changed out the lights, though these are temporary, we plan on putting can lights in later this year.


And hear we are at the end of February.  We have the new appliances installed, the cabinet next to the stove installed, all of the cabinets are stained, and the trim is painted.  So we only have to install the backplash and put up the open shelves and we're done for now.  Then we're taking a much needed break from the kitchen to focus on other, smaller projects. 

So that is what we've accomplished in a little over a year.  Not bad for two people that work full time and both have a ton of extra curricular activities.  I have to thank everyone that has helped us out.  We wouldn't be here without the help of family members and friends.

  ✵✵✵✵✵✵✵✵✵✵

Don't forget to stop by my other blog, Three Fates Design, to get this week's Friday Freebie.  The prefect way to start the weekend. 

Take care and have an enjoyable weekend.      

Thursday, March 8, 2012

I Can Cook Again

So that there is a working stove.  And boy am I happy that it is working.  Going a little over a week without one was killing me.  I had to be creative in what we ate, and well lets just say there was a lot of take out this past week.


The HVAC guy came out Monday afternoon and installed the valve on the gas line (thank god we had one run already).  It took him about 30 minutes and that included him going and getting the correct sized valve.  I was going to get some action shots, but before I knew it, the stove was installed.  In about a half an hour we had a fully functioning stove.   

And I cooked us a full meal Monday night and it was extremely enjoyable.  I also will say that I've never cooked a meal so fast.  I used the convection oven to roast a head of garlic and then make garlic cheese bread.  I made some red sauce and then some delish cheese ravioli.  It was a wonderful meal to test out our newest addition to the family.  I'm in love.   

J has already asked me if I was going to start treating the stove like a child.  Probably, not.  Okay, I probably will, but I mean cooking makes me so happy and having a stove like this puts me over the moon.

And if you turn to the right you'll see a fridge with a working water and ice dispenser.  Yup, we finally moved the water line this past weekend.  It's so nice.  We have ice and water at the push of a button again.  Which we both agree, makes us drink a lot more water.  Yay!


And I've started staining the open shelves, so hopefully by the end of the week we'll have those up and ready to go.  I can't believe that the kitchen is almost "done".

Lets take a look at what we've accomplished.

  1. Take down upper cabinet
  2. Take down built in China hutch
  3. Take down breakfast bar
  4. Stain cabinets
  5. Install new door pulls
  6. Paint inside of cabinets
  7. Paint walls
  8. Remake small shelves
  9. Put up open shelves
  10. Take down backsplash
  11. Put up new tile
  12. Install new flooring.  
  13. Get new appliances
  14. Install new lights
  15. Paint Trim
  16. Rerun water line
  17. Move fridge
  18. Build/buy counter by stove
  19. Build/buy counter by fridge
  20. Install recessed lighting
  21. Put up bamboo blinds
  22. Open up wall
  23. Build fridge surround
  24. Install crown molding
  25. Paint ceiling
We've accomplished a lot so far.  It's always interesting to look at pictures of when we first started.  It looks so different, and well, weird.  But we are extremely happy with what we've done.  Yay for doing it yourself.

Tuesday, March 6, 2012

Studio - Day 2

This past weekend I was able to prime and paint the second wall in my studio.  Now as stated earlier, because this room is filled with my crap and I don't have any other place to put it, I'm forced to paint around all my crap.  So that means one wall at a time.  Which is okay I guess, not how I would normally want to paint, but it works.

Here is what I'm working with.  Awful paneling.  It's just not us and it's definitely not what I want in my studio.  I want something fun, something that inspires me.  This isn't doing it for me.   


So out came the primer.   And two coats later, I had a paintable surface.   Luckily, the primer only takes one hour to dry, so I can at least get a full wall done in one day.  


Sorry for the night picture, but I wanted to get at least one picture of the primer (even if I had already started painting the blue).  And you can see the huge mess that I'm trying to paint around.  Hopefully the rest of the room will be a tad easier to paint.


And here is the start of the blue stripes.  I was sold on the blue at first, but I think it's growing on me.


And here we are after both the yellow and blue are up.  I still have a few spots to touch up and all the trim needs to be painted, but not bad.  It's definitely better then what it was.  And the room is a lot brighter already.

I'm hoping to be able to get the third wall done this weekend while J does homework.  Then on to painting and putting up storage shelves.  I can't wait to get this done.  It's going to be so nice to have a dedicated area for my stuff.  And hopefully it will help me stay organized.

What do you guys think of the paint color and stripes?  Two baby's room or do you think it will work?  I'd love to hear what everyone thinks.     

Thursday, March 1, 2012

Studio Redo - Day One

We have officially started making over my studio. This is one of the most exciting makeovers we've undertaken since we moved. Well maybe not for J, but it is for me.

This is what my studio looked like before we stared.


This is a clean picture, that you can't see what's on the counter tops.  It was the catch all, pile it all in there room.  It's not a bad room, just not what I dream about when I dream about my studio.  If that made any sense.


So I went and picked up some pretty paints and painted a little test patch.  Yes, yes I approve of that new color.  So up went the tape.  Now because this room is full of stuff that we have no room for anywhere else, this room will have to be painted in stages.  Not ideal, but it will work.


Let the cutting in begin.  It already looks better.  I mean you can just imagine how bright and inviting this room will be.


And here we are after the first coat.  So much brighter.  And the day I painted it was overcast and crappy out.  You know an average winter day here in WI.

I'm in love.  The color is fantastic and just brightens everything almost immediately.  And yes, a second coat was needed.  I don't care what paint manufactures say, you always need at least two coats.  That's my biggest pet peeve with this house.  The previous owners just painted one coat, and so every room is streaky and uneven.  Want to drive me crazy?  Just paint one coat on your walls.  I have yet to see the magical paint that actually only needs one coat.  And don't even think about suggesting the paint and primer combo, that angers me almost as much as streaky walls.  Okay, I'll get off my box now.

Back to my studio.

 
Now I have to tackle this side of the room.  Again this picture was taken when I had the counters cleaned off.  You have no idea what a mess they are again (and you can't see the mountain of things off camera).  Hopefully all of this side of the room will be filled with open shelves to keep everything on.  And I'll be able to use my counters as workspace, not storage.